FiRsT sTeP bY sTeP
Adore You… Layout
Step By Step
I have used 6 sheets of Grant Archival paper in this layout, (from Big W)
A self adhesive string of pearls,
Double sided tape
3D mounting blocks
Brown mini inking pad
Paper trimmer, craft knife, scalloped scissor and scissors
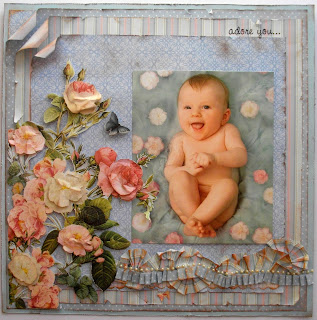
1. Choose the 4 sheets of background paper you wish to use in the layout, and trim and distress the edges. I have used the plain blue for the bottom layer, I have used an edge distresser, but you could also use the blade of your scissor. Once the edge has been distressed to your liking, rub the edges of your page with your brown mini ink pad until desired effect is acquired.
2. Trim the second bottom page (I used the blue and white dots) by half an inch on two sides. Distress and ink as you did with the previous page, as above.
3. Trim the third layer (I used the pink and blue striped paper) by an inch on two sides. Distress and ink as with the previous two pages.
4. Trim the top background page by two inches on two sides, distress and ink as with previous page.
5. Use your double sided tape to adhere and layer each page, leaving an inch and half of each side of the top left corner of each page, to be able to curl each layer back with your fingers, or by rolling each page open with the help of a round object such as a pencil or skewer. Ink the white part of the curl with a little brown ink as desired. I have used a piece of the top layer and adhered it to the bottom page, so it adds another dimension between the bottom and second last layer, as you can see in the picture.

6. Cut out the roses from the sheets of paper, I have used two pages for two layers of roses, and a third layer here and there for an extra touch. Use a good scissor to do this and you will need to use a craft knife to cut out between the leaves and flowers too. Cut away as much blue as possible.
7. If you like, you can ink the edges of all of the flowers and stems, as much as you can reach, this gives a good 3D effect. Remember to cut out two butterflies too.
8. Use your foam mounts to stick your roses onto your background pages. I have mounted the first, second and third layer with the 3D mounting blocks for extra height and dimension. Remember to do this with your two butterflies too.


9. For the third layer, I have cut out six roses and two leaves. Make sure they are all slightly smaller than the roses you are going to mount them on. I have just crinkled the roses and leaves in my hand a little. You can screw them up into little balls and open them up again, if you would like a more dramatic look. Ink the edges of each flower and leaf, and you can brush your ink over the top of each too if you want to add extra shadows. I only did this on the white rose in the middle. Mount these in place with the mounting blocks.
10. For the bottom boarder, I have used 3 different papers.. For the bottom scallop, I just used a piece of white and blue blocked paper from one of my son’s math books. I just cut a 2cm x 17cm strip, and used a pair of fancy scalloped scissors to cut the scollops. You can use any pattern. I inked the edges of the strip and stuck it down in place with double sided tape, positioned under the one leaf, reaching to the edge of the bottom right side, as seen in the picture below.
 11. For the second layer, I used the blue and pink striped 1 inch strips that I cut off my background paper. Take the shorter strip and crinkle it up, screw it up into a ball and then straighten it out slightly again. Try to stretch it from the under the leaf to the end of the page, as far as it will go while still having nice creases in it. Once you have the desired effect and length, set it aside. Place double sided tape just above the previously stuck boarder (the block paper in #10), stick the double sided tape down from under the leaf to as far as the crinkled up strip can reach. Place the crinkled up striped strip on top of the double sided tape, and press down to ensure it’s stuck.
 12. I then made 3 little fans with the other strip of blue and pink stripe, by making zig-zag folds in three strips, one inch wide by 12 inches long – roughly. Open them up slightly and squash them flat. Take the three little fans, try to fit them in under the blue and pink strip you have just placed onto the double sided tape, and press flat. Add more double sided tape underneath them to ensure they stay stuck in the position. As you can see in the picture above, I have made three little fans, two placed on top, on the left and right of the blue and pink strip, and the third is middle right at the bottom of the strip.
13. I have used the half inch strips from the cut-off’s of the dotted paper. Stuck double sided tape along the length of both the strips and made random pleats along the length of the strips. Join the two together in one of the folds. Place that pleated dotted strip along the previously placed blue and pink striped band, and press down, making sure the double sided tape grabs nicely. If not, add more double sided tape to secure. Rub over the boarder lightly with your brown mini ink pad, until desired affect is achieved.
 14. Finally, I have taken the string of pearls and run them just above the dotted paper, pressing down nice and firmly to make sure they stick firmly. The Adore You title is a rub-on transfer.
15. FINITO!!! Find a photo for your beautiful page and find someone to show it off to…

Step By Step
I have used 6 sheets of Grant Archival paper in this layout, (from Big W)
A self adhesive string of pearls,
Double sided tape
3D mounting blocks
Brown mini inking pad
Paper trimmer, craft knife, scalloped scissor and scissors
1. Choose the 4 sheets of background paper you wish to use in the layout, and trim and distress the edges. I have used the plain blue for the bottom layer, I have used an edge distresser, but you could also use the blade of your scissor. Once the edge has been distressed to your liking, rub the edges of your page with your brown mini ink pad until desired effect is acquired.
2. Trim the second bottom page (I used the blue and white dots) by half an inch on two sides. Distress and ink as you did with the previous page, as above.
3. Trim the third layer (I used the pink and blue striped paper) by an inch on two sides. Distress and ink as with the previous two pages.
4. Trim the top background page by two inches on two sides, distress and ink as with previous page.
5. Use your double sided tape to adhere and layer each page, leaving an inch and half of each side of the top left corner of each page, to be able to curl each layer back with your fingers, or by rolling each page open with the help of a round object such as a pencil or skewer. Ink the white part of the curl with a little brown ink as desired. I have used a piece of the top layer and adhered it to the bottom page, so it adds another dimension between the bottom and second last layer, as you can see in the picture.

6. Cut out the roses from the sheets of paper, I have used two pages for two layers of roses, and a third layer here and there for an extra touch. Use a good scissor to do this and you will need to use a craft knife to cut out between the leaves and flowers too. Cut away as much blue as possible.
7. If you like, you can ink the edges of all of the flowers and stems, as much as you can reach, this gives a good 3D effect. Remember to cut out two butterflies too.
8. Use your foam mounts to stick your roses onto your background pages. I have mounted the first, second and third layer with the 3D mounting blocks for extra height and dimension. Remember to do this with your two butterflies too.


9. For the third layer, I have cut out six roses and two leaves. Make sure they are all slightly smaller than the roses you are going to mount them on. I have just crinkled the roses and leaves in my hand a little. You can screw them up into little balls and open them up again, if you would like a more dramatic look. Ink the edges of each flower and leaf, and you can brush your ink over the top of each too if you want to add extra shadows. I only did this on the white rose in the middle. Mount these in place with the mounting blocks.
10. For the bottom boarder, I have used 3 different papers.. For the bottom scallop, I just used a piece of white and blue blocked paper from one of my son’s math books. I just cut a 2cm x 17cm strip, and used a pair of fancy scalloped scissors to cut the scollops. You can use any pattern. I inked the edges of the strip and stuck it down in place with double sided tape, positioned under the one leaf, reaching to the edge of the bottom right side, as seen in the picture below.


13. I have used the half inch strips from the cut-off’s of the dotted paper. Stuck double sided tape along the length of both the strips and made random pleats along the length of the strips. Join the two together in one of the folds. Place that pleated dotted strip along the previously placed blue and pink striped band, and press down, making sure the double sided tape grabs nicely. If not, add more double sided tape to secure. Rub over the boarder lightly with your brown mini ink pad, until desired affect is achieved.

15. FINITO!!! Find a photo for your beautiful page and find someone to show it off to…


my gosh that is some intricate work there Brenda. It looks awesome. thanks for visiting my blog i appreciate your comment:)
ReplyDeleteBren this is gorgeous! Adore all of your details!
ReplyDelete